Connect Surface to a TV, monitor, or projector
Applies To
SurfaceTo connect your Surface to another screen, you'll need a compatible cable and adapter. You can even connect to some displays wirelessly.
Which cables and adapters do I need?
This table lists recommended adapters for different Surface devices so you can find an adapter that connects to your external monitor. Additional adapters that may work, depending on your device, include:
-
Surface USB 3.0 Gigabit Ethernet Adapter (if your device has a USB-A port)
-
Microsoft Wireless Display Adapter (for Surface Pro 7+, Surface Pro 8, some other models)
Note: If you're unsure about which model you have, see Find out which Surface model you have.
|
Adapters |
Surface models |
Daisy chain support |
Audio Support |
|---|---|---|---|
|
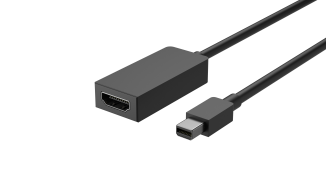
Mini DisplayPort to HDMI
|
Surface Pro 6, Surface Laptop 2 |
 |
 |
|
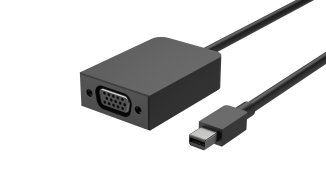
Mini DisplayPort to VGA
|
Surface Pro 6, Surface Laptop 2 |
 |
 |
|
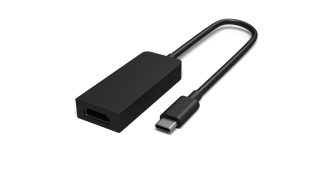
USB-C to HDMI
|
Surface Studio 2, Surface Studio 2+, Surface Book 2, Surface Book 3, Surface Go 2 and later generations, Surface Laptop 3 and later generations, Surface Go and later generations, Surface Laptop Studio, Surface Laptop Studio 2, Surface Pro 7 and later generations |
 |
 |
|
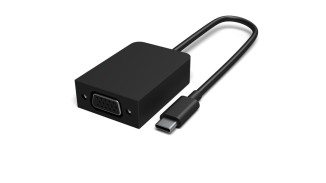
USB-C to VGA
|
Surface Studio 2, Surface Studio 2+, Surface Book 2, Surface Book 3, Surface Go 2 and later generations, Surface Laptop 3 and later generations, Surface Go and later generations, Surface Laptop Studio, Surface Laptop Studio 2, Surface Pro 7 and later generations |
 |
 |
Look at the video ports on your TV, monitor, or projector. Ports you usually see would include HDMI, DisplayPort, and VGA. This will help you determine what adapters and cables you need for your device, as they're often sold separately.
For the best results, we recommend:
-
If possible, use the same type of connection between your Surface or dock and your monitor.
-
If you can’t use the same type of connection, we recommend one of these types of connections (in order of best results): USB-C, DisplayPort (Mini DisplayPort), HDMI, DVI, VGA.
These adapters are recommended for use with your Surface:
Note: Surface display adapters are available in the Microsoft Store.
If your external screen has a DisplayPort
Depending on which Surface you have, you'll need one of the following:
-
A USB-C to DisplayPort adapter and DisplayPort cable (sold separately)
-
A Mini DisplayPort-to-DisplayPort cable (sold separately)
If your screen only has a Mini DisplayPort, you can set up the following connections—connect a USB-C to HDMI adapter to an HDMI cable then to an HDMI to Mini DisplayPort and then to your external screen.
Keep in mind that the more adapters used, the more degraded the signal may get.
If your external screen has an HDMI port
Depending on which Surface you have, you'll need one of the following:
-
A USB-C to HDMI adapter and HDMI cable (sold separately)
-
A Mini DisplayPort to HDMI adapter and HDMI cable (sold separately)
Tip: For best results when using your Surface with a high-resolution monitor, we recommend using an active HDMI cable.
If your external screen has a VGA port
Depending on which Surface you have, you'll need one of the following:
-
A USB-C to VGA adapter and VGA cable (sold separately)
-
A Mini DisplayPort to VGA adapter and VGA cable (sold separately)
A VGA adapter and cable are for video only. Audio will play from your Surface speakers unless you've connected external speakers. For more info, go to Surface sound, volume, and audio accessories.
Set up your TV, monitor, or projector
Make sure you have the correct cable(s) and adapter(s) for your devices. When you're ready, here's how to set it up:
-
Plug one end of the video cable into the port on the external screen. Make sure that your TV, monitor, or projector is turned on.
-
Connect the other end of the cable to the video adapter.
-
Connect the adapter to your Surface. Make sure you're plugging in the right part of the cable to the right input.
Note: If you're using a projector, make sure you connect any audio accessories.
For more info, or to troubleshoot your setup, go to Troubleshoot connecting Surface to an external display.
You can connect to wireless displays when Windows detects one nearby. You can also use a Microsoft Wireless Display Adapter to connect to a screen using Miracast. For info on setting up your Wireless Display adapter, go to Use the Microsoft Wireless Display Adapter.
When you're ready to connect wirelessly, here's how:
-
On your Surface, select the Network icon on the right side of the taskbar, then select the Cast quick setting.
-
In the list of displays and adapters, select the name of the wireless display or adapter that you want to connect to.
Tip: You can also use the keyboard shortcut (Windows logo key + K) to connect to a wireless display.
If you have problems connecting your Surface or have questions about screen resolution, see Troubleshoot connecting Surface to an external display.
After you've connected another screen to your Surface, you can choose what to display on each screen. Here’s how:
-
On your Surface, select the Network icon on the right side of the taskbar, then select the Project quick setting (or just press Windows logo key + P).
-
Choose one of the following options:
-
PC screen only: You’ll see everything on your Surface screen. (When you're connected to a wireless projector, this option changes to Disconnect.)
-
Duplicate: You’ll see the same things on all screens.
-
Extend: You'll see everything spread over all screens, and you can drag and move items between them.
-
Second screen only: You’ll see everything on the connected screen or screens, and your Surface screen will be blank.
-
You can also use the keyboard shortcut (Windows logo key + P) to change your options for the additional screen or screens.
How to use external screens with Surface
After you have your second monitor or a projector set up, you might want to have a taskbar on more than one screen to make switching between apps and files easier on the desktop. Here's how to get taskbars on all of your displays and change how buttons appear on them.
-
Select Search on the taskbar, enter taskbar, and in the search results, select Taskbar settings.
-
Select Taskbar behaviors, then select the Show my taskbar on all displays check box.
-
Next to When using multiple displays, show my taskbar apps on, choose one of the following options:
-
All taskbars: The taskbar buttons for all your open windows will be duplicated on the taskbars on each display.
-
Main taskbar and taskbar where window is open: A taskbar button will appear on your main monitor and in the taskbar on the display where the window is open.
-
Taskbar where window is open: A taskbar button will appear only on the display where the window is open. None of the buttons will be duplicated on other taskbars.
-
Connecting another monitor to your Surface is a great way to multitask. You can use one monitor for work (for example, running Office apps) and the other for play (chatting or music).
Once connected, use one of the following key combinations to move an app to the second screen:
|
To |
Do this |
|---|---|
|
Move Microsoft Store or desktop apps to another monitor. |
Windows logo key + Shift + Right arrow or Windows logo key + Shift + Left arrow You can also move a Microsoft Store or desktop app to another screen by clicking the title bar and dragging it to the other screen. |
|
Move Microsoft Store or desktop apps to the left, center, and right on a monitor. |
Windows logo key + Right arrow or Windows logo key + Left arrow |
Windows 11 makes it easy to use two apps side by side. For example, you can schedule meetings on your calendar while you respond to email, or record a lecture in class with Sound Recorder while you take notes in the desktop.
To use two apps side by side:
-
Open an app that you'd like to use.
-
Press and hold (or click and hold) the title bar and drag the app to one side of the screen.
-
On the other side of the screen, select another app. It will appear next to the first app.
Related topic
Support for Windows 10 will end in October 2025
After October 14, 2025, Microsoft will no longer provide free software updates from Windows Update, technical assistance, or security fixes for Windows 10. Your PC will still work, but we recommend moving to Windows 11.
To connect your Surface to another screen, you'll need a compatible cable and adapter. You can even connect to some displays wirelessly.
Which cables and adapters do I need?
This table lists recommended adapters for different Surface devices so you can find an adapter that connects to your external monitor. Additional adapters that may work, depending on your device, include:
-
Surface USB 3.0 Gigabit Ethernet Adapter (if your device has a USB-A port)
-
Microsoft Wireless Display Adapter (for Surface Pro 7+, Surface Pro 8, some other models)
Note: If you're unsure about your model, see Find out which Surface model you have.
|
Adapters |
Surface models |
Daisy chain support |
Audio Support |
|---|---|---|---|
|
Mini DisplayPort to HDMI
|
Surface 3, Surface Pro 6 and earlier generations, Surface Studio, Surface Laptop, Surface Laptop 2, Surface Book |
Yes (except for Surface 3) |
 |
|
Mini DisplayPort to VGA
|
Surface 3, Surface Pro 6 and earlier generations, Surface Studio, Surface Laptop, Surface Laptop 2, Surface Book |
Yes (except for Surface 3 |
 |
|
USB-C to HDMI
|
Surface Studio 2, Surface Book 2, Surface Book 3, Surface Go, Surface Go 2, Surface Go 3, Surface Go 4, Surface Laptop 3, Surface Laptop 4, Surface Laptop Go, Surface Laptop Go 2, Surface Laptop Go 3, Surface Laptop Studio, Surface Laptop Studio 2, Surface Pro 7, Surface Pro 7+, Surface Pro 8, Surface Pro X |
 |
 |
|
USB-C to VGA
|
Surface Studio 2, Surface Book 2, Surface Book 3, Surface Go, Surface Go 2, Surface Go 3, Surface Go 4, Surface Laptop 3, Surface Laptop 4, Surface Laptop Go, Surface Laptop Go 2, Surface Laptop Go 3, Surface Laptop Studio, Surface Laptop Studio 2, Surface Pro 7, Surface Pro 7+, Surface Pro 8, Surface Pro X |
 |
 |
Look at the video ports on your TV, monitor, or projector. Ports you usually see would include HDMI, DisplayPort, and VGA. This will help you determine what adapters and cables you need for your device, as they're often sold separately.
For the best results, we recommend:
-
If possible, use the same type of connection between your Surface or dock and your monitor.
-
If you can’t use the same type of connection, we recommend one of these types of connections (in order of best results): USB-C, DisplayPort (Mini DisplayPort), HDMI, DVI, VGA.
These adapters are recommended for use with your Surface:
Note: Surface display adapters are available in the Microsoft Store.
If your external screen has a DisplayPort
Depending on which Surface you have, you'll need one of the following:
-
A USB-C to DisplayPort adapter and DisplayPort cable (sold separately)
-
A Mini DisplayPort-to-DisplayPort cable (sold separately)
If your screen only has a Mini DisplayPort, you can set up the following connections—connect a USB-C to HDMI adapter to an HDMI cable then to an HDMI to Mini DisplayPort and then to your external screen.
Keep in mind that the more adapters you use, the more degraded the signal may get.
If your external screen has an HDMI port
Depending on which Surface you have, you'll need one of the following:
-
A USB-C to HDMI adapter and HDMI cable (sold separately)
-
A Mini DisplayPort to HDMI adapter and HDMI cable (sold separately)
Tip: For best results when using your Surface with a high-resolution monitor, we recommend using an active HDMI cable.
If your external screen has a VGA port
Depending on which Surface you have, you'll need one of the following:
-
A USB-C to VGA adapter and VGA cable (sold separately)
-
A Mini DisplayPort to VGA adapter and VGA cable (sold separately)
A VGA adapter and cable are for video only. Audio will play from your Surface speakers unless you've connected external speakers. For more info, go to Surface sound, volume, and audio accessories.
Set up your TV, monitor, or projector
Make sure you have the correct cable(s) and adapter(s) for your devices. When you're ready, here's how to set it up:
-
Plug one end of the video cable into the port on the external screen. Make sure that your TV, monitor, or projector is turned on.
-
Connect the other end of the cable to the video adapter.
-
Connect the adapter to your Surface. Make sure you're plugging in the right part of the cable to the right input.
Note: If you're using a projector, make sure you connect any audio accessories.
For more info, or to troubleshoot your setup, go to Troubleshoot connecting Surface to an external display.
You can connect to wireless displays when Windows detects one nearby. You can also use a Microsoft Wireless Display Adapter to connect to a screen using Miracast. For info on setting up your Wireless Display adapter, go to Use the Microsoft Wireless Display Adapter.
When you're ready to connect wirelessly, here's how:
-
On your Surface, select action center in the taskbar or swipe in from the right edge of the screen.
-
Select Connect. In the list of displays and adapters, select the name of the wireless display or adapter that you want to connect to.
You can also use the keyboard shortcut (Windows logo key +K) to connect to a wireless display.
If you have problems connecting your Surface or have questions about screen resolution, see Troubleshoot connecting Surface to an external display.
After you've connected another screen to your Surface, you can choose what to display on each screen. Here’s how:
-
Select the search box in the taskbar, enter project to a second screen, and in the search results, select Project to a second screen.
-
Choose one of the following options:
-
PC screen only: You’ll see everything on your Surface screen. (When you're connected to a wireless projector, this option changes to Disconnect.)
-
Duplicate: You’ll see the same things on all screens.
-
Extend: You'll see everything spread over all screens, and you can drag and move items between them.
-
Second screen only: You’ll see everything on the connected screen or screens, and your Surface screen will be blank.
-
You can also use the keyboard shortcut (Windows logo key + P) to change your options for the additional screen or screens.
How to use external screens with Surface
After you have your second monitor or a projector set up to your liking, you might want to have a taskbar on more than one screen to make switching between apps and files easier on the desktop. Here's how to get taskbars on all of your displays and change how buttons appear on them.
-
Select the search box in the taskbar, enter taskbar, and in the search results, select Taskbar settings.
-
Under Multiple displays, select Show taskbar on all displays.
-
From the Show taskbar buttons on list, choose one of the following options:
-
All taskbars: The taskbar buttons for all your open windows will be duplicated on the taskbars on each display.
-
Main taskbar and taskbar where window is open: A taskbar button will appear on your main monitor and in the taskbar on the display where the window is open.
-
Taskbar where window is open: A taskbar button will appear only on the display where the window is open. None of the buttons will be duplicated on other taskbars.
-
Connecting another monitor to your Surface is a great way to multitask. You can use one monitor for work (for example, running Office apps) and the other for play (chatting or music).
Once connected, use one of the following key combinations to move an app to the second screen:
|
To |
Do this |
|---|---|
|
Move Microsoft Store or desktop apps to another monitor. |
Windows logo key + Shift + Right arrow or Windows logo key + Shift + Left arrow You can also move a Microsoft Store or desktop app to another screen by clicking the title bar and dragging it to the other screen. |
|
Move Microsoft Store or desktop apps to the left, center, and right on a monitor. |
Windows logo key + Right arrow or Windows logo key + Left arrow |
Windows 10 makes it easy to use two apps side by side. For example, you can schedule meetings on your calendar while you respond to email, or record a lecture in class with Sound Recorder while you take notes in the desktop.
To use two apps side by side:
-
Open an app that you'd like to use.
-
Press and hold (or click and hold) the title bar and drag the app to one side of the screen.
-
On the other side of the screen, select another app. It will appear next to the first app.


