This article is for people who use a screen reader program such as Windows Narrator, JAWS, or NVDA with Microsoft 365 products. This article is part of the Microsoft 365 screen reader support content set where you can find more accessibility information on our apps. For general help, visit Microsoft Support.
Use Microsoft Lens and Immersive Reader with VoiceOver, the built-in iOS screen reader, to access and read scanned texts more easily, decode complex texts, and focus on the text in your documents. You'll also learn how to highlight syllables and parts of speech, use a picture dictionary, and translate content.
For detailed information on the supported languages, refer to Languages and products supported by Immersive Reader.
Notes:
-
New Microsoft 365 features are released gradually to Microsoft 365 subscribers, so your app might not have these features yet. To learn how you can get new features faster, join the Office Insider program.
-
This topic assumes that you are using the built-in iOS screen reader, VoiceOver. To learn more about using VoiceOver, visit Apple accessibility.
In this topic
Open Immersive Reader
-
After capturing and editing an image in Microsoft Lens, swipe right or left until you hear “Done button,” and double-tap the screen. The Export To page opens.
-
Swipe right until you hear “Immersive Reader button,” and double-tap the screen. It can take a few moments to scan texts from images, so don't worry if nothing happens immediately. Once the image has been processed, Immersive Reader opens, and you hear: "Double-tap to dismiss pop-up window."
Read the text in scanned images using Immersive Reader
When Immersive Reader has opened, the screen shows the text from the image you scanned. Now you can have Immersive Reader read the text aloud.
-
Tap with four fingers near the bottom of the screen. You hear: "Voice settings."
-
Swipe left until you hear “Play button,” and double-tap the screen. Each word is highlighted as theImmersive Reader narrator recites the document aloud.
-
To pause the dictation, swipe left or right until you hear "Pause button," and double-tap the screen. You hear: "Play button."
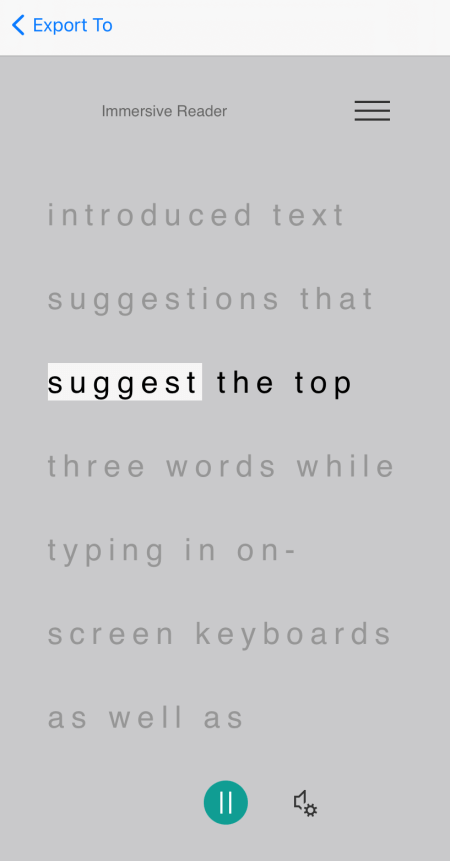
Use line focus
Using line focus in Immersive Reader may help you follow the text flow more easily. You can use line focus with dictation or when manually navigating the text.
-
Tap with four fingers near the top of the screen. You hear: "Double-tap to dismiss pop-up window." Swipe right until you hear “Menu button,” and double-tap the screen.
-
Swipe left or right until you hear "Reading preferences, button," and double-tap the screen.
-
Swipe right until you hear "Line focus, tick box, unticked," and double-tap the screen.
-
To select the line type, swipe right until you hear the option you want, for example, "Show one line of text when reading." To select, double-tap the screen.
-
To exit the reading preferences, swipe left until you hear "Close menu, button," and double-tap the screen.
-
In the document, you can let Immersive Reader read the text aloud, and the line or lines in focus are highlighted. Alternatively, to navigate the page up and down manually, swipe right or left until you hear either "Scroll down" or "Scroll up," and double-tap the screen. The highlighted row or rows are shown as you move up or down.
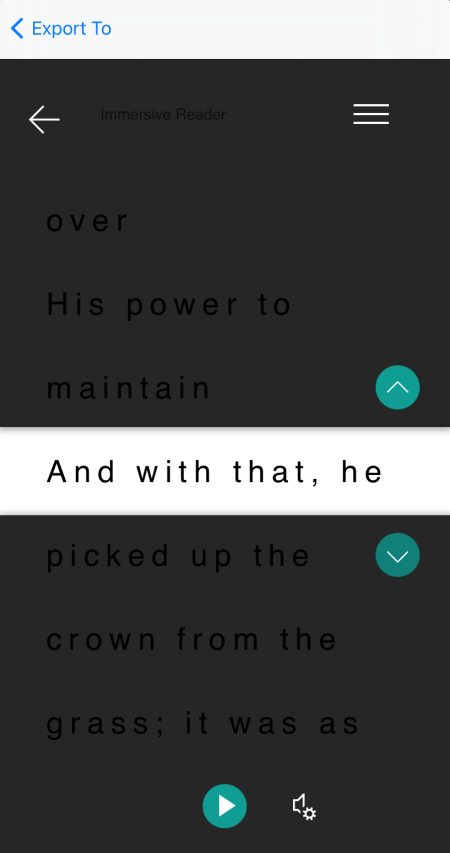
Use Picture Dictionary to learn more
If you want to see a picture related to a common word in the text or hear how the word is pronounced, use Picture Dictionary. Note that not all words have an image available.
-
To turn on Picture Dictionary, tap with four fingers near the top of the screen. You hear: "Double-tap to dismiss pop-up window." Swipe right until you hear “Menu button,” and double-tap the screen. Swipe left or right until you hear "Reading preferences, button," and double-tap the screen. Swipe right until you hear "Picture dictionary, unticked" and double-tap the screen. If you hear "Ticked," the option is already on. To return to the document, swipe left until you hear "Close menu, button," and double-tap the screen.
-
In the document, bring the focus to a word you would like to see a picture of, and then double-tap the screen. The image related to the word appears in a separate pop-up window on top of the text. You hear: "Listen, button."
-
To hear how the word is pronounced, double-tap the screen.
-
To close the image pop-up window, swipe left until you hear "Close button," and double-tap the screen.
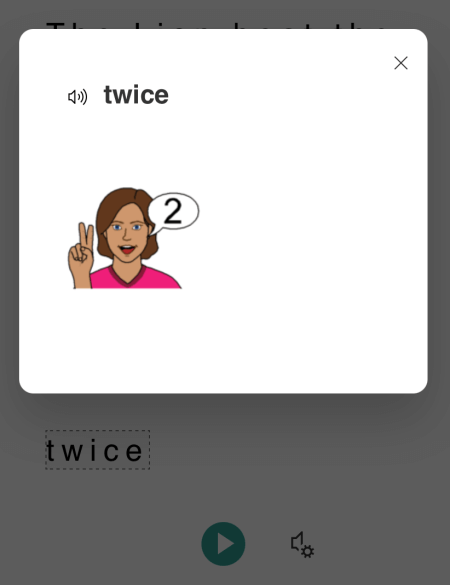
Translate text
With Immersive Reader you can translate your text into up to 67 languages.
-
Tap with four fingers near the top of the screen. You hear: "Double-tap to dismiss pop-up window." Swipe right until you hear “Menu button,” and double-tap the screen.
-
Swipe left or right until you hear "Reading preferences, button," and double-tap the screen.
-
To translate the text to another language, swipe right or left until you hear "Choose a language for translation," and double-tap the screen. The list of available languages appears at the bottom of the screen.
-
Switch the Rotor to "Adjust value."
-
Swipe up with one finger until you hear the language you want to translate your text into, swipe left until you hear "Toolbar, Done button," and double-tap the screen.
-
To select whether to translate the entire text, by word as you select them, or both, swipe right until you hear "Translate document" or "Translate words." Double-tap the screen to make a selection.
-
To return to the document, swipe left until you hear "Close menu, button," and double-tap the screen.
-
If you selected to translate both the entire document and by word, the text appears in the target language. You can now have Immersive Reader dictate the translation to you.
If you selected to translate the text by word as you select them, the text appears in the original source language. Navigate to the word whose translation you want to see and hear, and double-tap the screen. You hear: "Listen to translation." Double-tap the screen to hear the translated word.
Highlight syllables
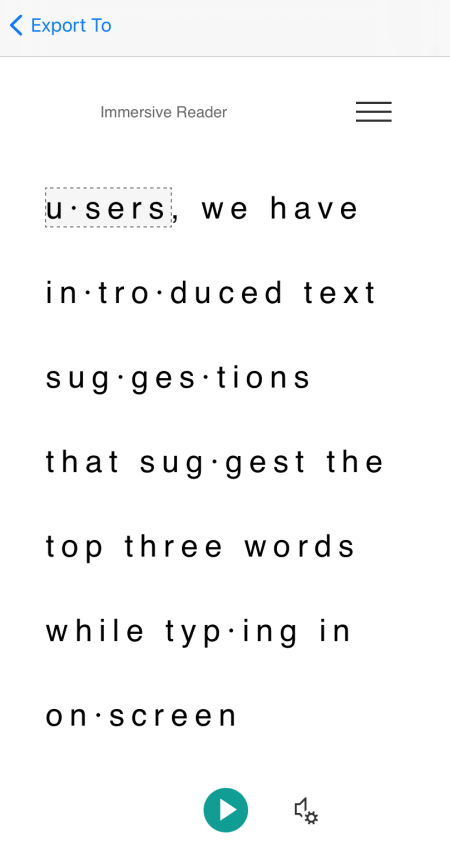
With Immersive Reader you can break words into syllables to improve readability or to sound out new words.
-
Tap with four fingers near the top of the screen. You hear: "Double-tap to dismiss pop-up window." Swipe right until you hear “Menu button,” and double-tap the screen.
-
Swipe left or right until you hear "Grammar options, button," and double-tap the screen.
-
Swipe right until you hear "Syllables, tick box, unticked," and double-tap the screen.
-
To return to the document, swipe left until you hear "Close menu, button," and double-tap the screen. The words are broken into syllables on your screen.
Highlight parts of speech
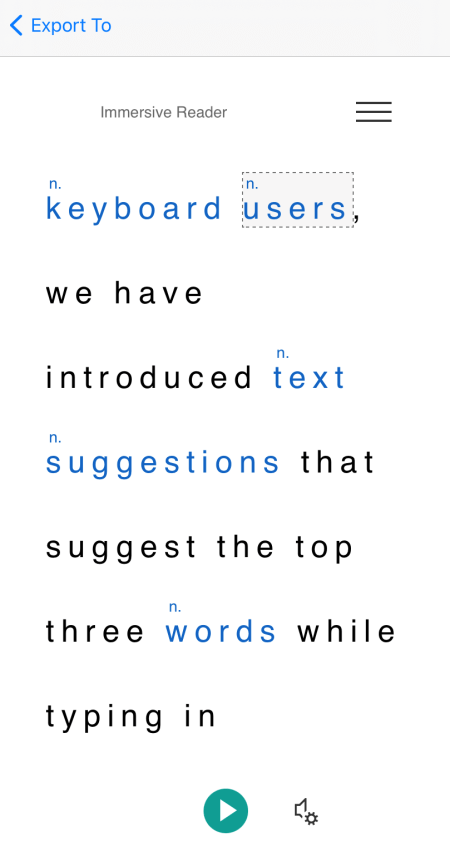
You can highlight the following parts of speech: Nouns, verbs, adjectives, or adverbs. Each part has been assigned a color, but you can change it to suit your needs.
-
Tap with four fingers near the top of the screen. You hear: "Double-tap to dismiss pop-up window." Swipe right until you hear “Menu button,” and double-tap the screen.
-
Swipe left or right until you hear "Grammar options, button," and double-tap the screen.
-
Swipe right until you hear the part you want to highlight, for example, "Nouns, tick box, unticked," and double-tap the screen to select.
-
If you want to change the default color assigned to the part, swipe left until you hear "Color choices," followed by the part of speech you selected and the current color, and double-tap the screen. Swipe right or left until you hear the name of the color you want, and double-tap the screen.
-
If you want to display the part labels as small letters above the word, swipe right until you hear "Show labels," and double-tap the screen.
-
To return to the document, swipe left until you hear "Close menu, button," and double-tap the screen. When you navigate the text, VoiceOver announces the parts when you arrive on a word that matches your selection. You hear, for example, "Noun," followed by the word.
Change the text preferences
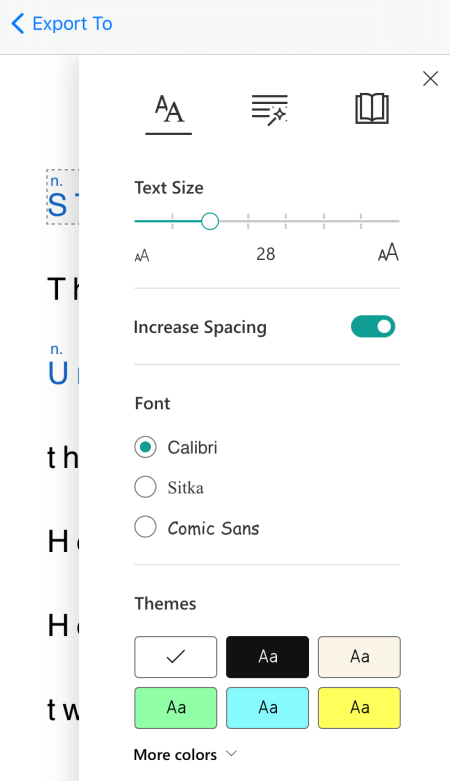
Immersive Reader has several options to help you consume the text on the screen in the way that you want to. You can, for example, try the text size settings in combination with the text spacing until you find a combination that works for you.
-
Tap with four fingers near the top of the screen. You hear: "Double-tap to dismiss pop-up window." Swipe right until you hear “Menu button,” and double-tap the screen.
-
Swipe left or right until you hear "Text preferences, button," and double-tap the screen.
-
To change the text preferences, do one or both of the following:
-
To increase the space between letters and lines in the text, swipe left or right until you hear "Increase spacing, tick box, unticked," and double-tap the screen." If you hear "Ticked," the increased spacing is already on.
-
To change the text size, swipe left until you hear “Text size,” followed by the current text size. To increase the text size, double-tap and hold the screen, slide your finger to the right until you reach the text size you want, and then lift the finger off the screen. To decrease the text size, double-tap and hold the screen, slide your finger to the left until you reach the text size you want, and then lift the finger off the screen.
-
-
To exit the text preferences, swipe left until you hear "Close menu, button," and double-tap the screen.
Change the voice options
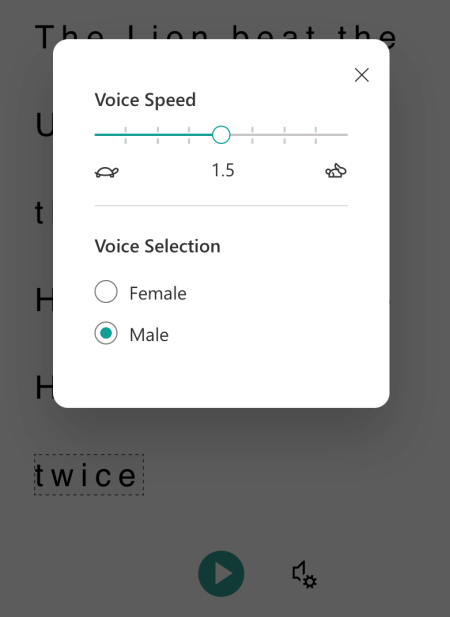
You can change the speaking speed and voice of Immersive Reader.
-
Tap with four fingers near the bottom of the screen. You hear: "Voice settings." Double-tap the screen.
-
To adjust the speaking speed, swipe left until you hear "Voice speed," followed by the current value. Double-tap and hold the screen, slide your finger to the right to increase the speed or to the left to decrease it. When you've reached the speed you want, lift your finger off the screen.
-
To change the speaking voice, swipe left or right until you hear "Voice selection," followed by either "Female" or "Male," and double-tap the screen to select an option.
-
To exit the voice options and return to the document view, swipe left until you hear "Close dialog," and double-tap the screen.
See also
Basic tasks using a screen reader with Microsoft Lens
Use a screen reader to explore and navigate Microsoft Lens
Set up your device to work with accessibility in Microsoft 365
Use Microsoft Lens and Immersive Reader with TalkBack, the built-in Android screen reader, to increase the readability of content, decode complex texts, and help you focus on the text of your documents. You'll also learn how to highlight syllables and parts of speech, use a picture dictionary, and translate content.
For detailed information on the supported languages, refer to Languages and products supported by Immersive Reader.
Notes:
-
New Microsoft 365 features are released gradually to Microsoft 365 subscribers, so your app might not have these features yet. To learn how you can get new features faster, join the Office Insider program.
-
This topic assumes that you are using the built-in Android screen reader, TalkBack. To learn more about using TalkBack, go to Android accessibility.
In this topic
Open Immersive Reader
-
After capturing and editing an image in Microsoft Lens, swipe right or left until you hear “Done,” and double-tap the screen. The Export To page opens.
-
Swipe right until you hear “Immersive Reader,” and double-tap the screen. It can take a few moments to scan texts from images, so don't worry if nothing happens immediately. When the image has been processed, Immersive Reader opens.
Read the text in scanned images using Immersive Reader
When Immersive Reader has opened, the screen shows the text from the image you scanned. Now you can have Immersive Reader read the text aloud.
-
Explore near the bottom of the screen until you hear “Play button,” and double-tap the screen. Each word is highlighted as the narrator recites the document aloud.
-
To pause the dictation, double-tap the screen.
Use line focus
Using line focus in Immersive Reader may help you follow the text flow more easily. You can use line focus with dictation or when manually navigating the text.
-
Explore near the top of the screen until you hear "Immersive Reader," then swipe right until you hear “Menu button,” and double-tap the screen.
-
Swipe left or right until you hear "Reading preferences," and double-tap the screen.
-
Swipe right until you hear "Not checked, Line focus, switch," and double-tap the screen.
-
To select the line type, swipe right until you hear the option you want, for example, "Show one line of text when reading." To select, double-tap the screen.
-
To exit the reading preferences, swipe left until you hear "Close menu, button," and double-tap the screen.
-
In the document, you can let Immersive Reader read the text aloud, and the line or lines in focus are highlighted. Alternatively, to navigate the page up and down manually, swipe right or left until you hear either "Scroll down" or "Scroll up," and double-tap the screen. The highlighted row or rows are shown as you move up or down.
Use Picture Dictionary to learn more
If you want to see a picture related to a word in the text or hear how the word is pronounced, use Picture Dictionary. Note that not all words have an image available.
-
To turn on Picture Dictionary, explore near the top of the screen until you hear "Immersive Reader," then swipe right until you hear “Menu button,” and double-tap the screen.
-
Swipe left or right until you hear "Reading preferences," and double-tap the screen.
-
Swipe right until you hear "Picture dictionary," and swipe right once. If you hear "Checked," the option is already on. If not, double-tap the screen. To return to the document, swipe left until you hear "Close menu, button," and double-tap the screen.
-
In the document, bring the focus to a word you would like to see a picture of, and then double-tap the screen. The image related to the word appears on a separate pop-up window on top of the text. You hear: "Listen, button."
-
To hear how the word is pronounced, double-tap the screen.
-
To close the image pop-up window, swipe left until you hear "Close button," and double-tap the screen.
Translate text
With Immersive Reader you can translate your text into up to 67 languages.
-
Explore near the top of the screen until you hear "Immersive Reader," then swipe right until you hear “Menu button,” and double-tap the screen.
-
Swipe left or right until you hear "Reading preferences," and double-tap the screen.
-
To translate the text to another language, swipe right or left until you hear "Choose a language for translation," and double-tap the screen. The list of available languages appears at the bottom of the screen.
-
Swipe left or right until you hear the language you want to translate your text into and double-tap the screen.
-
To select whether to translate the entire text, by word as you select them, or both, swipe right until you hear "By word" or "Document." Double-tap the screen to make your selection.
-
To return to the document, swipe left until you hear "Close menu, button," and double-tap the screen.
-
If you selected to translate both the entire document and by word, the text appears in the target language. You can now have Immersive Reader dictate the translation to you.
-
If you selected to translate the text only by word, the text appears in the original source language. Navigate to the word whose translation you want to see and hear, and double-tap the screen. You hear: "Listen to translation." Double-tap the screen to hear the translated word.
Highlight syllables
-
Explore near the top of the screen until you hear "Immersive Reader," then swipe right until you hear “Menu button,” and double-tap the screen.
-
Swipe left or right until you hear "Grammar options, button," and double-tap the screen.
-
Swipe right until you hear "Not checked, Syllables, switch," and double-tap the screen.
-
To return to the document, swipe left until you hear "Close menu, button," and double-tap the screen. The syllables are shown in the text.
Highlight parts of speech
You can highlight the following parts of speech: Nouns, verbs, adjectives, or adverbs. Each part has been assigned a color, but you can change it to suit your needs better.
-
Explore near the top of the screen until you hear "Immersive Reader," then swipe right until you hear “Menu button,” and double-tap the screen.
-
Swipe left or right until you hear "Grammar options, button," and double-tap the screen.
-
Swipe right until you hear the part you want to highlight, for example, "Nouns," and double-tap the screen to select.
-
If you want to change the default color assigned to the part, swipe left until you hear "Color choices," followed by the part of speech you selected and the current color, and double-tap the screen. Swipe right or left until you hear the name of the color you want, and double-tap the screen.
-
If you want to display the part labels as small letters above the word, swipe right until you hear "Show labels," and double-tap the screen.
-
To return to the document, swipe left until you hear "Close menu, button," and double-tap the screen.
-
When you navigate the text, TalkBack announces the parts when you arrive on a word that matches your selection. You hear, for example, "Noun," followed by the word.
Change the text preferences
Immersive Reader has several options to help you consume the text on the screen in the way that you want to. You can, for example, try the text size settings in combination with the text spacing until you find a combination that works for you.
-
Explore near the top of the screen until you hear "Immersive Reader," then swipe right until you hear “Menu button,” and double-tap the screen.
-
Swipe left or right until you hear "Text preferences, button," and double-tap the screen.
-
To change the text preferences, do one or more of the following:
-
To change the Increase Spacing toggle setting, swipe right until you hear “Increase spacing,” and double-tap the screen. This setting defines the font spacing. When the increased spacing is on, you hear "Checked." The wide spacing increases the space between letters, as well as the space between lines. Regular spacing is used in most books and documents.
-
To change the text size, swipe left until you hear “Text size,” followed by the current text size. To increase the text size, double-tap and hold the screen, slide your finger to the right until you reach the text size you want, and then lift the finger off the screen. To decrease the text size, double-tap and hold the screen, slide your finger to the left until you reach the text size you want, and then lift the finger off the screen.
-
To change the text font, swipe right until you hear “Font,” then swipe right until you hear the name of the font you want to use, and double-tap the screen.
-
-
To exit the text preferences, swipe left until you hear "Close menu, button," and double-tap the screen.
Change the voice options
You can change the speaking speed and voice of Immersive Reader.
-
Explore near the bottom of the screen until you hear “Voice settings," and double-tap the screen.
-
To adjust the speaking speed, swipe left until you hear "Voice speed," followed by the current value. Double-tap and hold the screen, slide your finger to the right to increase the speed or to the left to decrease it. When you've reached the speed you want, lift your finger off the screen.
-
To change the speaking voice, swipe left or right until you hear "Voice selection," followed by either "Female" or "Male," and double-tap the screen to select an option.
-
To exit the voice options and return to the document view, swipe left until you hear "Close dialog," and double-tap the screen.
See also
Basic tasks using a screen reader with Microsoft Lens
Use a screen reader to explore and navigate Microsoft Lens
Set up your device to work with accessibility in Microsoft 365
Technical support for customers with disabilities
Microsoft wants to provide the best possible experience for all our customers. If you have a disability or questions related to accessibility, please contact the Microsoft Disability Answer Desk for technical assistance. The Disability Answer Desk support team is trained in using many popular assistive technologies and can offer assistance in English, Spanish, French, and American Sign Language. Please go to the Microsoft Disability Answer Desk site to find out the contact details for your region.
If you are a government, commercial, or enterprise user, please contact the enterprise Disability Answer Desk.


